Every angler knows the sinking feeling when their favorite fishing rod breaks mid-cast or during an epic battle with a fish. However, before you rush to replace that expensive rod, consider this: most fishing rod damage can be repaired at home with basic tools and materials. Many anglers turn to Fishing Gear Shops for replacement gear, but understanding simple repair techniques can save you hundreds of dollars over your fishing lifetime.
The good news is that fixing a broken fishing rod doesn’t require professional expertise or expensive equipment. Additionally, most common rod problems can be solved with items you likely already have at home. Therefore, learning these essential repair skills will keep you on the water longer and your wallet happier.
Common Types of Fishing Rod Damage
Understanding the type of damage to your fishing rod is crucial for determining the best repair approach. Most rod damage falls into several predictable categories that respond well to DIY fixes.
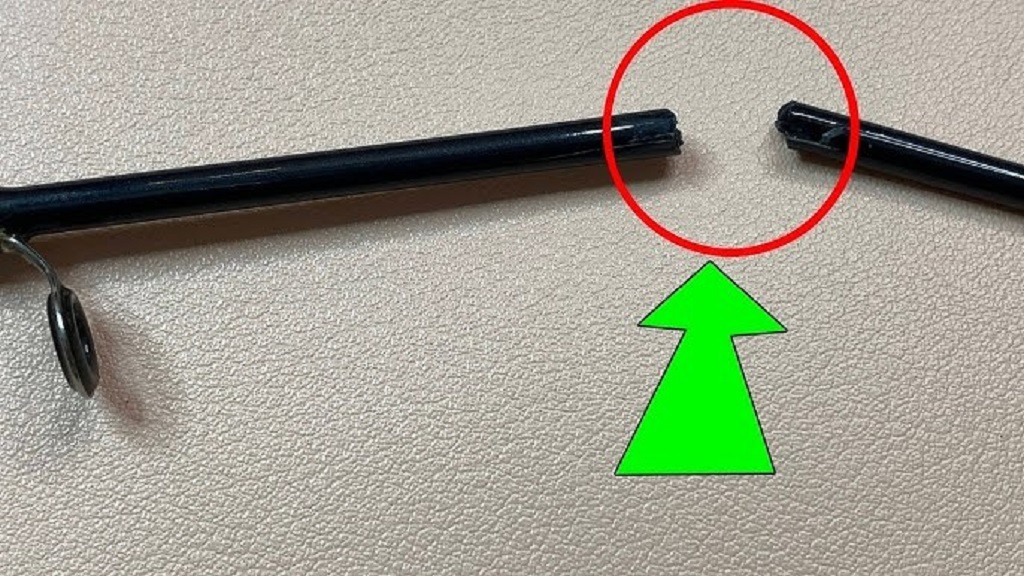
Tip breaks represent the most frequent type of fishing rod damage. These typically occur when rods are dropped, stepped on, or caught in car doors. Furthermore, aggressive hooksets or fighting large fish can snap rod tips cleanly off.
Guide damage is another common issue that affects rod performance significantly. Guides can crack, lose their ceramic inserts, or break completely off the rod blank. Moreover, worn guides with rough edges will fray your fishing line and reduce casting distance.
Rod blank cracks or splits usually happen near the ferrules or at stress points where the rod experiences maximum bend. These cracks often start small but grow larger over time if left untreated.
Essential Tools and Materials for Rod Repair
Successfully repairing fishing rods requires having the right tools and materials on hand. Fortunately, most repair supplies are inexpensive and readily available at hardware stores or online retailers.
Basic tools include sandpaper in various grits, sharp scissors or a razor blade, measuring tape, and small files. Additionally, you’ll need epoxy adhesive, thread or fishing line for wrapping, and clear finish coating to protect your repairs.
For guide repairs specifically, keep replacement guides in common sizes, guide feet, and ceramic inserts. Thread in black or brown colors works well for most rod finishes. However, you can match your rod’s original thread color for a more professional appearance.
Step-by-Step Guide to Fixing Broken Rod Tips
Rod tip repairs are among the easiest fixes for beginning rod builders. Most tip breaks occur in the top 6-12 inches of the rod, making replacement straightforward.
Start by carefully examining the break to determine if you can salvage the existing tip-top guide. Clean breaks often allow you to reuse the original guide on the shortened rod blank. However, if the break is jagged or the guide is damaged, you’ll need a replacement tip-top.
Sand the broken end of the rod blank smooth and square. Measure the inside diameter of your new tip-top guide and sand the rod blank to fit snugly. The blank should slide into the guide about 3/8 inch deep.
Apply a thin layer of epoxy to both the rod blank and inside the tip-top guide. Press the guide onto the blank and align it with the other guides. Allow the epoxy to cure according to manufacturer instructions before using the rod.
Repairing Damaged Guides
Guide replacement requires more patience but follows a logical process. According to Field & Stream magazine, proper guide spacing affects rod action significantly, so taking measurements before removal is essential.
Begin by carefully cutting away the thread wrapping around the damaged guide. Use a sharp razor blade and work slowly to avoid damaging the rod blank underneath. Once the old thread is removed, the guide should slide off easily.
Position the new guide in the exact location of the old one and secure it temporarily with tape. Check alignment with other guides by threading a piece of monofilament through all guides from tip to reel seat.
Wrap the new guide using steady tension and overlapping turns. Start the wrap about 1/4 inch from the guide foot and work toward the guide ring. Additionally, finish the wrap by threading the working end under several turns and pulling tight.
Fixing Rod Blank Cracks and Splits
Rod blank damage requires careful assessment to determine if repair is worthwhile. Small surface cracks often respond well to epoxy treatment, while deep splits may compromise rod integrity permanently.
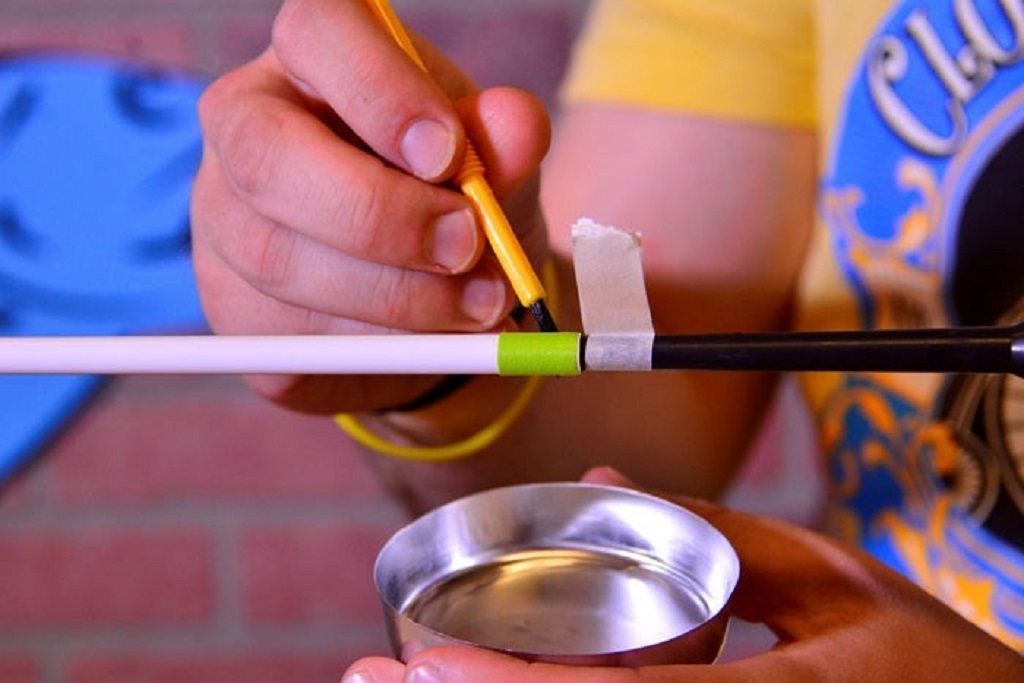
Clean the damaged area thoroughly with alcohol to remove any dirt or fish slime. For hairline cracks, work thin epoxy into the crack using a small brush or toothpick. However, larger splits may require reinforcement with fiberglass cloth or carbon fiber tape.
Apply epoxy over the repair area and sand smooth once cured. Multiple thin coats typically provide better results than one thick application. Therefore, plan on applying 2-3 coats for optimal strength and appearance.
When to Repair vs. Replace Your Rod
Not every broken fishing rod is worth repairing. Economic factors and rod condition should guide your decision-making process.
Expensive rods with minor damage almost always justify repair costs. However, budget rods with extensive damage might be better replaced entirely. Additionally, consider the rod’s age and how much use it has remaining.
Sentimental value also plays a role in repair decisions. That first rod or a gift from a loved one might be worth repairing regardless of monetary value. Furthermore, learning repair skills on less expensive rods builds confidence for working on premium equipment.
Preventing Future Rod Damage
Prevention remains the best strategy for protecting your fishing rod investment. Simple precautions can eliminate most common damage scenarios.
Always store rods in protective cases or tubes when transporting them. Car doors account for numerous rod tip breaks each year. Moreover, avoid leaning rods against vehicles or walls where they can fall unexpectedly.
Regular inspection helps identify potential problems before they become major repairs. Check guides for cracks or loose wrappings after each fishing trip. Additionally, examine the rod blank for small cracks that could spread over time.
According to Bass Pro Shops, proper rod care includes cleaning salt residue after saltwater fishing and storing rods in a dry environment to prevent corrosion.
Advanced Repair Techniques
Experienced anglers can tackle more complex repairs with additional tools and skills. These techniques require practice but offer significant cost savings on premium rods.
Ferrule repairs address loose or damaged rod joints. Heat application and careful fitting can restore proper ferrule function. However, this repair requires patience and specific tools for best results.
Handle replacement involves removing the entire grip and reel seat assembly. This extensive repair typically costs less than rod replacement but requires several hours of careful work.
Professional vs. DIY Repairs
Some repairs exceed amateur capabilities and require professional attention. Recognizing these limitations prevents further damage to valuable equipment.
Warranty repairs should always go through authorized service centers. Attempting DIY fixes on warranty-covered rods typically voids manufacturer coverage. Therefore, check warranty status before beginning any repair work.
Custom rod builders possess specialized tools and experience for complex repairs. Their services cost more than DIY fixes but guarantee professional results on expensive equipment.
Read More Also: Getting your trailer ready for boating season
Conclusion
Fixing a broken fishing rod doesn’t have to break your budget or require professional expertise. Most common rod damage responds well to simple repairs using basic tools and materials. Furthermore, learning these essential skills keeps you fishing while building confidence for tackling more complex projects.
Remember that prevention remains more cost-effective than repairs. However, when damage does occur, assess the situation carefully and choose appropriate repair techniques. Additionally, don’t hesitate to seek professional help for valuable rods or complex damage beyond your skill level.
With practice and patience, you can extend your fishing rod’s life significantly while saving money for other gear upgrades. Therefore, invest in basic repair supplies and start with simple fixes to build your rod repair expertise.
Read More Also: The Ultimate Guide to Successfully Launching Your New School
Frequently Asked Questions
Q: How much does it cost to repair a fishing rod professionally?
A: Professional rod repairs typically range from $25-75 depending on the damage type and rod value. Simple guide replacements cost less than complex blank repairs or handle replacements.
Q: Can I use super glue instead of epoxy for rod repairs?
A: Super glue works for temporary fixes but lacks the flexibility and durability of proper epoxy. Epoxy remains the preferred adhesive for permanent fishing rod repairs due to its waterproof properties and shock resistance.
Q: How long should I wait before using a repaired fishing rod?
A: Allow epoxy repairs to cure for at least 24 hours before light use. However, wait 48-72 hours before subjecting repaired rods to heavy fishing pressure or large fish battles.
Q: Is it worth repairing a $30 fishing rod?
A: Generally, rods under $50 are better replaced than repaired unless the damage is very minor. The cost of materials and time often exceeds the rod’s replacement value for budget equipment.
Q: What’s the most common cause of fishing rod breaks?
A: Car doors and improper storage cause the majority of rod tip breaks. Additionally, high-sticking during fish fights and stepping on rods account for many rod failures that could be prevented with proper technique and care.